A Beginner's Guide to Using Google Test for C++: Writing Reliable Unit Tests Made Easy!

Google Test, developed by Google, is a robust C++ testing framework widely used for writing and executing automated unit tests.
It offers a comprehensive suite of features and macros to simplify the process of creating and managing test cases.
With Google Test, developers can ensure the reliability and stability of their C++ codebase by verifying expected behaviors and detecting regressions through automated testing.
Installing
MacOS
The easiest way to obtain Google Test is through Homebrew. If you don't already have Homebrew installed, you can do so by running the following command:
/bin/bash -c "$(curl -fsSL https://raw.githubusercontent.com/Homebrew/install/HEAD/install.sh)"To install Google Test, simply execute the following command:
brew install googletestLinux (Ubuntu)
sudo apt-get install libgtest-dev

sudo apt-get install cmake # install cmake
cd /usr/src/gtest
sudo cmake CMakeLists.txt
sudo make

# copy or symlink libgtest.a and libgtest_main.a to your /usr/lib folder
sudo cp *.a /usr/lib
From Source Code
git clone https://github.com/google/googletest
cd googletest
mkdir build
cd build
cmake ..
make
make install
Integrating Google Test into Your IDE
XCode
After completing the installation, simply add the installation location to the 'Header Search Paths' in your project settings. This can be done by navigating to 'Target' -> 'Build Settings' -> 'Search Paths' -> 'Header Search Paths'.
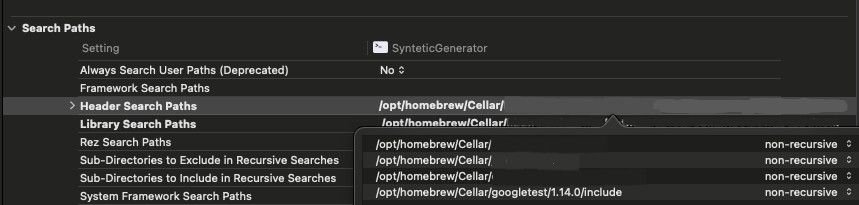
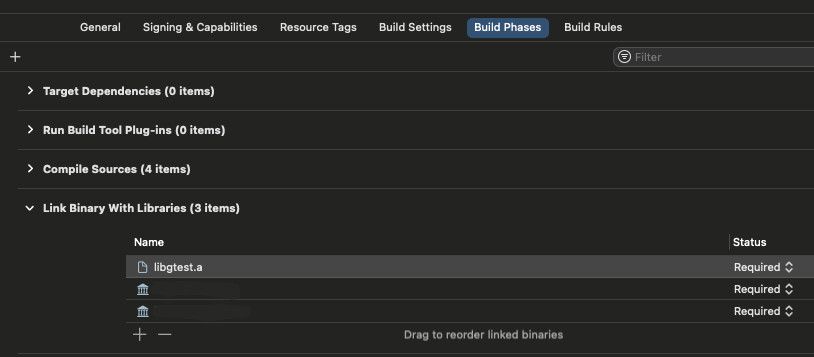
And include the binary from your installation in the 'Link Binary With Libraries' section of your project settings. This can be found under 'Target' -> 'Build Phases' -> 'Link Binary With Libraries'. If you installed Google Test using Homebrew, the binary can typically be found at /opt/homebrew/Cellar/googletest/VERSION/lib/libgtest.a."
Now, you're all set to begin utilizing Google Test's Test Suite.
Writing Test Cases
First, ensure you add the following code snippet to your main function. By doing so, the tests will be executed automatically when you run your code:
#include <gtest/gtest.h>

int main(int argc, const char * argv[]) {
    testing::InitGoogleTest(&argc, (char**)argv);
    return RUN_ALL_TESTS();
}
This code initializes the Google Test framework and runs all the registered tests. Adding it to your main function ensures that your tests are executed whenever you run your program.
Let's begin by implementing a simple function to calculate the Fibonacci sequence for a given number, which we'll later test. Make sure to include this function in your codebase so that we can write tests to verify its correctness
int fibonacci(int n) {
    if (n <= 1)
        return n;

    return fibonacci(n - 1) + fibonacci(n - 2);
}
Now, let's proceed to write our initial test case.
- Define test cases using the
TEST()macro provided by Google Test, specifying a unique name for each test case. - Within each test case, use assertion macros such as
ASSERT_EQ,ASSERT_TRUE, andASSERT_FALSEto verify expected behaviors and outcomes. - Organize test cases into logical groups to facilitate readability and maintainability of your test suite.
And it will looks like the one below.
// Tests fibonacci of negatives.
TEST(FibonacciTest, HandlesNegativeInput) {
    EXPECT_EQ(fibonacci(-10), -10);
}
To expand the test coverage, simply add as many logical groups of test cases as necessary.
// Tests fibonacci of negatives.
TEST(FibonacciTest, HandlesNegativeInput) {
    EXPECT_EQ(fibonacci(-10), -10);
}

// Tests fibonacci of 0 or 1.
TEST(FibonacciTest, HandlesZeroOrOneInput) {
    EXPECT_EQ(fibonacci(0), 0);
    EXPECT_EQ(fibonacci(1), 1);
}

// Tests fibonacci of positive numbers.
TEST(FibonacciTest, HandlesPositiveInput) {
    EXPECT_EQ(fibonacci(2), 1);
    EXPECT_EQ(fibonacci(3), 2);
    EXPECT_EQ(fibonacci(4), 8); //Wrong
    EXPECT_EQ(fibonacci(8), 21);
}
And when you run it you will get the results below
[==========] Running 3 tests from 1 test suite.
[----------] Global test environment set-up.
[----------] 3 tests from FibonacciTest
[ RUN      ] FibonacciTest.HandlesNegativeInput
[       OK ] FibonacciTest.HandlesNegativeInput (0 ms)
[ RUN      ] FibonacciTest.HandlesZeroOrOneInput
[       OK ] FibonacciTest.HandlesZeroOrOneInput (0 ms)
[ RUN      ] FibonacciTest.HandlesPositiveInput

/PathToYourTestFile/Tests.hpp:38: Failure
Expected equality of these values:
  fibonacci(4)
    Which is: 3
  8

[  FAILED  ] FibonacciTest.HandlesPositiveInput (0 ms)
[----------] 3 tests from FibonacciTest (0 ms total)

[----------] Global test environment tear-down
[==========] 3 tests from 1 test suite ran. (0 ms total)
[  PASSED  ] 2 tests.
[  FAILED  ] 1 test, listed below:
[  FAILED  ] FibonacciTest.HandlesPositiveInput

 1 FAILED TEST
Program ended with exit code: 1
Hey, it seems like we need to address a failing test case in our code. Let's investigate and fix the issue to ensure our tests pass successfully.
// Tests fibonacci of negatives.
TEST(FibonacciTest, HandlesNegativeInput) {
    EXPECT_EQ(fibonacci(-10), -10);
}

// Tests fibonacci of 0 or 1.
TEST(FibonacciTest, HandlesZeroOrOneInput) {
    EXPECT_EQ(fibonacci(0), 0);
    EXPECT_EQ(fibonacci(1), 1);
}

// Tests fibonacci of positive numbers.
TEST(FibonacciTest, HandlesPositiveInput) {
    EXPECT_EQ(fibonacci(2), 1);
    EXPECT_EQ(fibonacci(3), 2);
    EXPECT_EQ(fibonacci(4), 3); //Fixed
    EXPECT_EQ(fibonacci(8), 21);
}[==========] Running 3 tests from 1 test suite.
[----------] Global test environment set-up.
[----------] 3 tests from FibonacciTest
[ RUN ] FibonacciTest.HandlesNegativeInput
[ OK ] FibonacciTest.HandlesNegativeInput (0 ms)
[ RUN ] FibonacciTest.HandlesZeroOrOneInput
[ OK ] FibonacciTest.HandlesZeroOrOneInput (0 ms)
[ RUN ] FibonacciTest.HandlesPositiveInput
[ OK ] FibonacciTest.HandlesPositiveInput (0 ms)
[----------] 3 tests from FibonacciTest (0 ms total)
[----------] Global test environment tear-down
[==========] 3 tests from 1 test suite ran. (0 ms total)
[ PASSED ] 3 tests.
Program ended with exit code: 0Now you have the basics to create your own test cases.
Assertions
Assertions are statements used in software to validate specific conditions during runtime. They ensure that assumptions made by the programmer are true. If an assertion fails, it indicates a potential issue in the code being tested. In testing frameworks, assertions are crucial for verifying expected behavior and detecting errors. Some of the more common assertions are:
EXPECT_NE or ASSERT_NE: Verifies that val1!=val2.
Does pointer equality on pointers. If used on two C strings, it tests if they are in different memory locations, not if they have different values.
When comparing a pointer to NULL, use EXPECT_NE(ptr, nullptr) instead of EXPECT_NE(ptr, NULL).
ASSERT_TRUE or EXPECT_TRUE: Verifies that condition is true.
EXPECT_FALSE or ASSERT_FALSE: Verifies that condition is false.
ASSERT_EQ or EXPECT_EQ: Verifies that val1==val2.
Does pointer equality on pointers. If used on two C strings, it tests if they are in the same memory location, not if they have the same value. Use EXPECT_STREQ to compare C strings (e.g. const char*) by value.
When comparing a pointer to NULL, use EXPECT_EQ(ptr, nullptr) instead of EXPECT_EQ(ptr, NULL).
For further details, please refer to the official documentation.
Test Fixtures
Test fixtures are reusable setups for test cases. They help ensure consistent environments and reduce repetitive setup code by providing common initialization and cleanup routines.
To illustrate this concept, let's define a simple class called FileManager. This class is designed to perform basic file management tasks such as creating, deleting, and checking the existence of files.
#include <filesystem>
#include <fstream>

namespace fs = std::filesystem;

class FileManager {
public:
    bool createFile(const std::string& filename) {
        std::ofstream file(filename);
        return file.is_open();
    }

    bool deleteFile(const std::string& filename) {
        return fs::remove(filename);
    }

    bool isFileExists(const std::string& filename) {
        return fs::exists(filename);
    }
};
Let's create a fixture test class named FileManagerTestFixture to encapsulate common setup and teardown operations for our file management tests. This class will be derived from the ::testing::Test class and will contain methods to set up and tear down the test environment.
class FileManagerTestFixture : public ::testing::Test {
protected:
    void SetUp() override {
        // Create a FileManager object and initialize files for testing
        fileManager.createFile("file1.txt");
        fileManager.createFile("file2.txt");
    }

    void TearDown() override {
        // Clean up files created during testing
        fileManager.deleteFile("file1.txt");
        fileManager.deleteFile("file2.txt");
    }

    FileManager fileManager; // FileManager object used in tests
};
Now, we'll define test cases within our fixture test class to verify the functionality of our FileManager class. Each test case will correspond to a specific behavior of the file management functions, such as creating a file, deleting a file, or checking if a file exists.
TEST_F(FileManagerTestFixture, CreateFile) {
    // Arrange: FileManager is initialized with files "file1.txt" and "file2.txt"
    // Act: Create a new file
    fileManager.createFile("file3.txt");

    // Assert: Check if the new file exists
    ASSERT_TRUE(fileManager.isFileExists("file3.txt"));
}

TEST_F(FileManagerTestFixture, DeleteFile) {
    // Arrange: FileManager is initialized with files "file1.txt" and "file2.txt"
    // Act: Delete one of the files
    fileManager.deleteFile("file1.txt");

    // Assert: Check if the deleted file no longer exists
    ASSERT_FALSE(fileManager.isFileExists("file1.txt"));
}

TEST_F(FileManagerTestFixture, CheckFileExists) {
    // Assert: Check if the deleted file no longer exists
    ASSERT_TRUE(fileManager.isFileExists("file1.txt"));
    ASSERT_FALSE(fileManager.isFileExists("file4.txt"));
}
Advanced Features and Integration Tools
Google Test offers a plethora of advanced features that empower developers to write comprehensive and expressive tests for their C++ codebases.
With parameterized tests, developers can run the same test logic with different input values, while type-parameterized and value-parameterized tests enable testing with different types and sets of input values, respectively.
Test fixtures provide a flexible mechanism for setting up and tearing down the test environment, allowing for customized initialization and cleanup for each test case or test suite.
Google Test's extensive range of assertions, including equality checks, comparison operators, and string matches, ensures thorough testing of code behavior.
Additionally, developers can create custom assertion macros to encapsulate common assertion patterns or domain-specific checks.
Test listeners further enhance testing capabilities by enabling customization of test execution behavior and data collection during test runs.
Furthermore, Google Test seamlessly integrates with CMake, the popular build system, facilitating easy incorporation into C++ projects.
Its compatibility with continuous integration (CI) tools ensures seamless integration into the development workflow, enabling automated testing and validation processes.
Well that's enough for today, hope you leverage this information to improve your workflow, Happy Testing!
Salvatore.