Python Packages 101: A Developer's Journey from Code to Community

Welcome to the world of unlocking the full potential of your Python code! Python, known for its simplicity and readability, also shines in its versatility. A game-changer for Python is its knack for creating and sharing packages—bundles of code that can be easily shared, reused, and collaborated on.
Why Python Packages Matter
Picture this: your code isn't limited to just your computer or team; it has the ability to reach a global audience. Python packages make this happen. Whether you're building a small tool or a complex system, packaging your code simplifies sharing and opens doors to collaboration and innovation.
What This Guide Offers
In this guide, we'll break down the process of creating and sharing Python packages. Whether you're a seasoned developer or just starting, this guide empowers you with the knowledge and skills needed to make the most of Python packages.
Key Highlights:
- Organizing Your Code: Learn how to structure your Python package for clarity and easy maintenance.
- Setup.py Essentials: Understand the basics of the
setup.pyfile, your package's key to entering the Python world. - Clear Documentation & Licensing: Explore the importance of straightforward documentation and licensing for a successful package.
- Local Testing: Ensure your package works as expected by testing it on your computer.
- Creating Distributions: Discover how to create distributions, making your code accessible to the wider Python community.
- Sharing on Platforms: Explore platforms like PyPI and GitHub to share your creations with the world.
1. Organizing your code.
An organized package structure is not just about aesthetics; it directly impacts how others engage with and contribute to your code. A well-structured package encourages collaboration, enhances maintainability, and ensures a smoother development experience. In this section, we'll guide you through the art of structuring your Python package for brilliance and efficiency.
The Anatomy of a Well-Structured Package
a. Main Module (Your Package's Foundation): start with a clear main module that serves as the foundation of your package. This module often carries essential functionalities and sets the tone for your entire codebase.
b. Submodules (Dividing and Conquering): divide your code into submodules, each handling a specific aspect of your package. This modular approach enhances code organization and makes it easier for users to navigate your project.
c. Package Directory (A Neat Home for Your Code): keep things tidy by placing your modules within a dedicated package directory. This not only maintains order but also avoids clutter in your project's root folder.
d. init.py (The Package Signifier): don't forget the __init__.py file within your package directory. It signals to Python that your directory should be treated as a package, allowing for smoother imports.
If you follow these instructions, your resulting Python package structure could resemble the following example for a hypothetical package named awesome_package:
awesome_package/
|-- awesome_module.py
|-- submodules/
|   |-- __init__.py
|   |-- submodule1.py
|   |-- submodule2.py
|-- __init__.py
|-- README.md
|-- setup.py
|-- LICENSE.txt
|-- tests/
    |-- test_awesome_module.py
    |-- test_submodules/
        |-- __init__.py
        |-- test_submodule1.py
        |-- test_submodule2.py
2. Setup.py (Setup essentials).
Now that your Python package is brilliantly organized, it's time to navigate the gateway to packaging and distribution—setup.py. This file is your key to entering the Python ecosystem and making your package accessible to others.
In setup.py we can provide information about its contents, dependencies, and how it should be installed. Let's break down the essentials:
a. Package Information (Defining your identity): Specify fundamental details about your package, such as its name, version, author, and a brief description. This information is crucial for users to understand what your package offers.
from setuptools import setup

setup(
    name='awesome_package',
    version='0.1.0',
    author='Your Name',
    description='An awesome Python package for...',
    packages=['awesome_package'],
)
b. Dependecies (Declaring your allies): outline the dependencies your package relies on. This ensure that users can easily install and use your package without compatibility issues.
setup(
    # ...
    install_requires=[
        'dependency1',
        'dependency2',
    ],
)
c. Scripts and entry points: if your package includes scripts or executable entry points setup.py is the place to declare them. This step ensures seamless execution for users:
setup(
    # ...
    scripts=['scripts/myscript.py'],
    entry_points={
        'console_scripts': [
            'mycommand = awesome_package.module:main_function',
        ],
    },
)
d. Additional metadata: add any additional metadata that enhances your package's presentation on platforms like PyPi. This includes classifiers, keywords and more.
setup(
    # ...
    classifiers=[
        'Development Status :: 3 - Alpha',
        'License :: OSI Approved :: MIT License',
        'Programming Language :: Python :: 3',
        # ...
    ],
    keywords='python package example',
)
In this section, you'll discover a brief reference guide to the standard metadata frequently employed in setup.py.
name: Your package's name.
version: The version number of your package.
author: Your name or the package author's name.
description: A brief description of your package.
packages: A list of package directories to include.
install_requires: Dependencies your package needs.
scripts: Scripts to be installed with your package.
entry_points: Executable entry points.
classifiers: Metadata classifiers for your package.
keywords: Keywords related to your package.
3. README & License (Your Project's Passport).
As your Python package takes shape, it's time to craft its passport—the README file and the License. These two elements not only guide users through your project but also set the rules for engagement.
Crafting a Stellar README
a. Introduction (The elevator pitch): begin with a concise introduction, often referred to as the "elevator pitch." Clearly state what your project does and why it matters.
b. Installation (Getting started): provide an easy-to-follow instructions on how users can install your package. Include any prerequisites and highlight essential commands.
c. Usage (Show, don't just tell): demonstrate how users can make the most of your package with usage examples. Include code snippets and clear explanations.
d. Documentation (Dig deeper): if your package has extensive functionalities, consider linking to detailed documentation for users seeking in-depth information.
e. Contributing (Welcome collaboration): encourage others to contribute to your project. Specify guidelines for bug reporting, feature requests and the contribution process.
Licensing: Setting the Ground Rules
Why License Matters: a clear license fosters collaboration, protects contributors, and sets the groundwork for a healthy open-source community.
Choosing a License (Your project's rulebook): choose a license that aligns with your preferences for how others should use, modify, and share your code. Incorporate the complete text of the selected license in your project. For a more detailed explanation of license alternatives for your project, you can refer to this resource here.
Finally, your README.md file will resemble the example below.
# Awesome Package

An amazing Python package for [insert purpose].

## Installation

You can install Awesome Package using pip:

pip install awesome_package

## Usage

```python
import awesome_package

result = awesome_package.do_something()
print(result)
```
## Documentation

Explore the full documentation [here](link_to_docs).

## Contributing

We welcome contributions! Check out our [Contribution Guidelines](CONTRIBUTING.md).

## License

This project is licensed under the [MIT License](LICENSE.txt) - see the [LICENSE.txt](LICENSE.txt) file for details.
4. Local Testing.
Testing is your guardian against bugs and unexpected issues, providing a solid foundation for a robust codebase. Due to the depth of this topic, we'll be dedicating an entire post to guide you through the intricacies of testing in Python. Stay tuned for our upcoming exploration on effective testing practices—it's a crucial step in delivering code you can trust!
5. Creating distributions
With your Python package thoroughly tested, it's time to share your creation with the world. Packaging involves creating distributions that make your code accessible and easy to install for others. Let's navigate the process of packaging your brilliance!
a. Source distribution (stdist): the source distribution is the core package, containing all the necessary source files. It is the universal format, allowing users to install your package on any platform and is done with the command below:
python setup.py sdist
b. Wheel distribution (bdist_wheel): The wheel distribution is a binary package, optimized for faster installation. It's a popular choice and can be created alongside the source distribution with the command below:
python setup.py bdist_wheel
6. Distribution Platforms:
Now that your Python package is impeccably crafted and thoroughly tested, it's time to share it with the world. Platforms like PyPI and GitHub offer unique advantages for reaching a global audience, each with its own strengths, in this post we will cover only PyPi.
a. PyPi - Python Package Index (the epicenter of python packages): PyPI is the central hub for Python packages, connecting developers and users worldwide. Uploading your package to PyPI ensures it's easily discoverable and accessible to the broader Python community.
Uploading to PyPI with Twine:
- Create an Account: Before you begin, create an account on PyPI.
- Install Twine: Use the following command to install Twine, a tool that securely uploads your distributions to PyPI:
pip install twine
- Upload Distributions: Navigate to your 'dist' directory (where your distributions are located) and use Twine to upload them to PyPI:
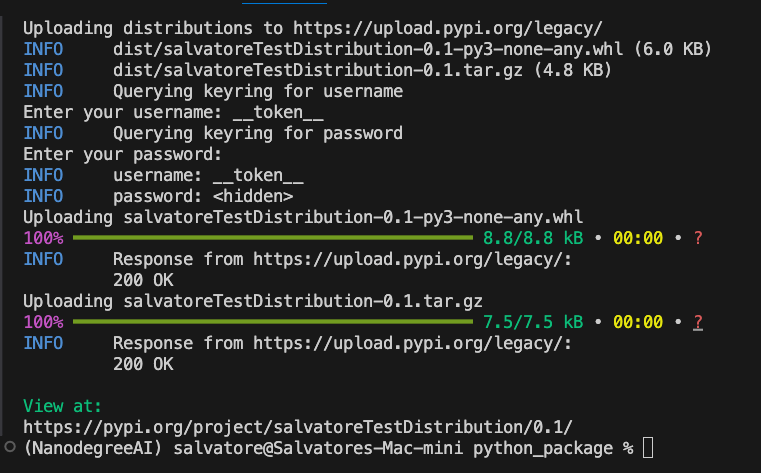
twine upload dist/*
Upon prompt, you'll be required to enter your username and password. However, if you've activated 2FA (Two-Factor Authentication), generate a token in your account settings. When prompted for the username, input "__token__" and for the password, enter the token beginning with "pypi-." And after it finish all is done you now could install your package in any computer using pip install yourawesomepackage
The process will look like the one below:
Conclusion
Congratulations on reaching the final stage of our Python package journey! You've meticulously crafted, tested, and packaged your code, and now it's time to unleash it upon the world. Here's a summary of the empowering steps you've taken:
Now, as you embark on the next chapter of your Python journey, remember that empowering your code is not just about lines of logic. It's about sharing knowledge, collaborating with a global community, and thriving in the vibrant ecosystem of Python development.
Stay tuned for future posts as we explore advanced topics, tips, and tricks to elevate your coding experience. May your code empower, inspire, and leave an indelible mark on the ever-evolving landscape of Python development. Share, collaborate, and thrive!
Happy coding!